Anchoring is more than just dropping a hunk of metal to the seabed. It's about safety, peace of mind, and preserving the pristine nature of our anchorage spots. Whether you're a weekend cruiser or a long-term liveaboard, you've likely dealt with the challenges and frustrations of anchoring.
That's where a windlass comes in—a device designed to make your anchoring life a whole lot easier. But if you think operating a windlass is as simple as pushing a button, well, there's more to it than meets the eye. From the intricacies of different types of windlasses to the nitty-gritty of how to use them when dropping or raising your anchor, this article is your definitive guide to mastering the use of a windlass.
So go ahead, tie up your dinghy and climb aboard for a sundowner. By the end of this article, you'll be well on your way to becoming a windlass wizard, ensuring your boat stays put when you want it to and comes free when you're ready to set sail for new horizons.
What is a Windlass and Why Use One?
A windlass is a mechanical device designed to help you raise and lower your anchor. Essentially, it's a specialized winch installed at the bow of your boat. While you may be able to anchor without one (depending on how large and heavy your ground tackle is), a windlass offers some notable advantages worth considering, whether you're a weekend adventurer or someone who lives aboard or cruises full-time.
Advantages of Using a Windlass Over Manual Methods:
-
Physical Ease: A windlass lets you preserve your energy for other activities. My wife and I cruised a season in the Bahamas after our windlass died, and hauling that 65-pound anchor up by hand was an exhausting endeavor. It made us less excited about raising anchor and moving to the next beautiful anchorage, less able to easily raise anchor in an emergency, and Neptune forbid you ever have to reset your anchor a couple of times in a row!
-
Speed: When time is of the essence, a windlass ensures you can anchor or set sail more quickly than if you were doing it manually.
-
Safety: A windlass allows you to quickly and easily pick up and move if someone else is dragging towards you, if you're dragging and need to reset your anchor, or any number of other hazardous situations.
-
Solo Sailing: For those who sail single-handed, a windlass is nearly indispensable. Anchoring solo in non-ideal conditions can be a challenge, and a windlass significantly improves your control and safety in such situations.
-
Convenience: A windlass makes the routine task of anchoring simpler, adding to your overall comfort and enjoyment of life on the water.
In summary, a windlass is more than just a convenient tool—it's an investment in safety, efficiency, and comfort. It can be particularly beneficial for those who sail alone or shorthanded and find themselves having to manage multiple tasks simultaneously. With these advantages in mind, the next logical step is to explore the different types of windlasses available, and that's exactly what we'll do next.
Types of Windlasses and How to Choose the Right One
Understanding the variety of windlasses available is essential for choosing the one that's right for you and your boat. Let's delve into the key features and differences you'll need to consider:
Horizontal Windlasses
-
Features: These windlasses are positioned entirely on the deck, with both the motor and gearbox above deck.
-
Pros: Easier to install and maintain due to the above-deck setup; less below-deck space needed.
-
Cons: Takes up more room on the deck.
-
Best For: Boats that have more deck space to spare but limited room below deck.
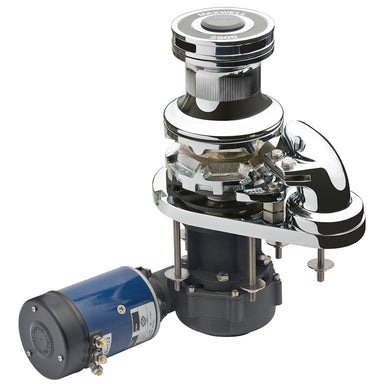
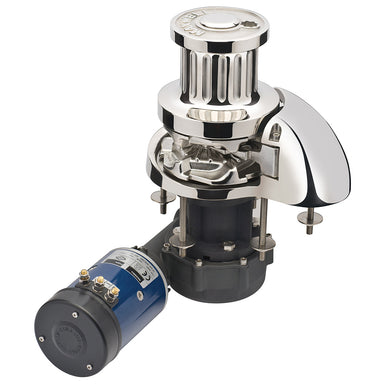
Vertical Windlasses
-
Features: In vertical windlasses, the unit is divided between the deck and below-deck spaces, with the gypsy above and most of the motor and gears below.
-
Pros: Takes up less deck space; often viewed as more aesthetically pleasing.
-
Cons: Requires more space below deck for installation.
-
Best For: Boats that have limited deck space or that can afford to dedicate room below deck and want to keep the deck clear.
Windlasses With Capstans
-
Features: A capstan is an additional drum on the windlass, designed for more versatile rope handling. It can be used for multiple tasks beyond just anchoring, like warping.
-
Pros: Increased versatility, allowing for a variety of rope-related tasks. Can also aid with retrieving a second anchor.
-
Cons: The inclusion of a capstan means the unit takes up more space and will cost a bit more.
-
Best For: Boaters who require additional rope-handling capabilities or wish to use it for a second anchor.
Windlasses Without Capstans
-
Features: These windlasses feature only the gypsy for chain or rope handling, with no additional drum for other tasks.
-
Pros: Simpler to operate and often less expensive; takes up less space than windlasses with capstans.
-
Cons: Less versatile; limited to only anchoring with a single anchor.
-
Best For: Those who primarily need a windlass for straightforward anchoring and have limited space or budget considerations.
Manual Windlasses
-
Features: Operated by hand, often using a winch handle.
-
Pros: No electrical power needed; lower maintenance.
-
Cons: Physically demanding; time-consuming.
Electric Windlasses
-
Features: Powered by the boat's electrical system.
-
Pros: Quick and less physically demanding.
-
Cons: Requires electrical power; higher maintenance costs.
To sum up, your windlass choice hinges on a variety of factors such as boat size, available space, and your specific needs for anchoring and other onboard activities. With this newfound knowledge, you're well-equipped to select a windlass that complements your seafaring lifestyle. Up next, we'll look into how to operate your chosen windlass most effectively.
How to anchor using your windlass
For a cruiser, understanding the nuances of a well-set anchor can make the difference between a serene night under the stars and a sleepless night. Let's examine the critical factors that influence how to anchor like a salty sailor.
The Best Type of Sea Bed to Anchor In
The type of sea bed you choose plays a significant role in how well your anchor holds. Mud and soft sand are generally your best bets, as your anchor is likely to dig in deep and hold strong. On the flip side, rocky terrains, coral reefs, and areas with heavy grass are less ideal due to their reduced holding ability and the risk they pose to marine ecosystems.
While your anchor might catch a rocky or grassy bottom when you first back down on it, when the tide changes and your boat swings the other direction, your anchor may pop free and bounce along the bottom—just the thing you don't want to happen in the middle of the night or during a storm.
Calculating the Scope for Your Anchor Chain
The scope of your anchor chain is a key element that determines how well your anchor will hold. Essentially, the scope is the ratio of the length of chain you let out to the depth of the water. Commonly, a scope ratio of between 4:1 to 7:1 is used, depending on variables like wind strength and current.
However, there are additional variables that come into play, often overlooked but incredibly important:
First off, there's your boat's freeboard, which is the distance from the waterline to the deck. Add the freeboard to the water depth when calculating your scope, since the chain usually meets the boat at deck-level.
For example, in 10 feet of water with a 4-foot freeboard and a target 5:1 scope, you'd calculate 14 feet (water depth + freeboard) times 5, requiring 70 feet of chain to be let out.
The second variable is how the water depth is impacted by the tides. If you anchor at low tide, failing to account for the rising tide can dramatically alter your scope and compromise your anchoring.
To account for this, make sure you know the tidal range for your anchoring location and know where you are in the rising or falling tide at the time you set your anchor. So if the tidal range is 4 feet and you anchor at low tide, you’d add the 4-foot tide to your original 14 feet for a total of 18 feet, requiring 90 feet of chain at a 5:1 scope.
Also, keep in mind that you will likely want more scope for heavier winds and waves. Some captains use 7:1 or as high as 10:1 scope when strong winds are in the forecast.
By including your boat's freeboard and accounting for the changing tides and weather, you'll have an accurate, safe scope calculation.
Lowering the Anchor
Lowering the anchor isn't just about dropping it into the water; it's a controlled, calculated move. When you've decided where to drop your anchor, let the anchor down until it hits the bottom. Then slowly let out your chain, allowing your boat to naturally fall back with the wind or current. This method gives the anchor a better chance to settle properly and helps prevent the chain from piling up and fouling it.
Setting the Anchor
Once your anchor is on the sea floor and you've let out the desired scope, the next step is to set the anchor. This usually involves putting your boat in reverse and applying a gradual force to dig the anchor into the sea bed.
Once you feel the anchor grab, continue backing down on it for a few seconds to make sure it doesn't drag. It helps to have someone standing on the bow with a hand or foot resting on the taut chain (carefully avoiding the windlass, bow roller and other components to avoid injury), as you can often feel the chain vibrating if the anchor is bouncing along the bottom.
Rigging a Snubber or Bridle
Anchor snubbers and bridles can also play a vital role in your anchoring system. Let’s break down what they are, why you’d use them, and how to do it right.
What are Snubbers and Bridles?
Snubbers: A snubber is essentially a short piece of nylon rope attached between the anchor chain and a strong point on your boat, such as a cleat. The nylon acts as a shock absorber, taking on some of the tension and movement, thereby protecting your windlass and chain.
Bridles: Bridles function similarly to snubbers but typically have two legs that attach to different points on the boat, providing a more balanced pull and redundancy in case one of the legs fails.
Why Use Them?
Reducing Strain on the Windlass: Your windlass is not designed to handle the full tension of your boat pulling against the anchor. Snubbers and bridles take up that tension and redistribute it.
Shock Absorption: The elasticity of the snubber line absorbs shocks from wave action or sudden pulls, which is especially useful in choppy conditions.
How to Install and Use
Snubber Installation: To install a snubber, simply attach one end to a strong point on your boat and hook the other end to a link in your anchor chain using a chain hook. Make sure the length of the snubber is adequate to absorb shocks.
Bridle Setup: For a bridle, attach each leg to different points on your boat, usually port and starboard cleats. Connect the other end to your anchor chain just like you would with a snubber.
Diving on the Anchor
If you're in a location with clear water and warm weather, you may choose to dive on the anchor and inspect it visually. This can help to put your mind at ease if you're unfamiliar with the sea bottom and want to make sure the anchor is well set. In many locations and climates, however, this won't be practical. Some people devise a "look bucket" -- a bucket with a clear plexiglass bottom that they can use to check their anchor in clear waters.
Anchor Alarms
An anchor alarm is an extra measure that can help you sleep better at night. This alarm alerts you if your boat drifts outside of a predefined radius, signaling that your anchor may have dragged and giving you a chance to check it. Modern chart plotters include anchor alarms, and a number of mobile apps offer this feature.
Understanding these intricacies of the anchoring process will go a long way in ensuring that you're anchored safely and securely, freeing you to enjoy all the beauty and tranquility that life afloat has to offer. In our next section, we'll cover how to maintain your windlass for optimal performance and longevity.
Raising Anchor with a Windlass
Raising your anchor efficiently and safely is as essential as setting it. Here's your guide to using a windlass for this task.
Preparations
Start Your Engine: Before you even touch that windlass control, make sure your engine is running. This ensures that your battery won’t drain and you have enough power for the windlass and other onboard systems.
Having your engine warmed up and ready also gives you immediate control of the boat during and after the process of raising your anchor. You don't want to have your anchor halfway retrieved, bouncing along the bottom on a short scope as you struggle to get the engine started and are blown towards a rocky shore!
Loosen Any Securing Mechanisms: Whether you use a chain stopper, bridle, or snubber, now is the time to disengage it. This frees the chain or rope and readies it for a smooth lifting process.
The Lifting Process
Motor Slowly in Forward Idle: Put your engine in forward idle and steer your boat towards the anchor. This action reduces tension on the anchor chain, making it easier to lift. You don't want to use your windlass to pull your boat towards the anchor — the windlass wasn't designed for this type of load.
Engage the Windlass and Lift: As you slowly move forward and the anchor chain is slack, engage your windlass and start pulling in the chain. It often helps to have one person on the bow, pointing at the anchor and operating the windlass, while another person helms the boat towards the anchor and switches between forward idle and neutral to keep a slow and steady pace.
Tips for a Smooth Lift
Stuck on the Bottom: Often your anchor will be so well dug into the bottom that the windlass can't pop it loose. This is especially common when the bottom is thick sand or mud. If this happens, don't panic. Just relax for a minute and let the boat sit over top of the anchor. The natural movement of the boat bobbing in the waves will usually slowly work the anchor free within a couple of minutes, and you'll be able to resume raising it with the windlass.
Handling Snags: Snags sometimes happen when the anchor has hooked something like a rock or underwater debris. If you find that the anchor is stuck, try altering your boat’s position to change the pull angle. Often, this simple trick can free a stubborn anchor.
Clearing Mud or Debris: After the anchor reaches the surface, you may find it covered in mud or other debris. Many boaters use a boat hook or a simple rinse from the deck wash to clear this off. A clean anchor is easier to secure and reduces mess on deck.
Wrapping Up
Mastering the use of a windlass offers more than just convenience; it's an integral part of safe boating, sailing, and cruising. Understanding the ins and outs of your windlass system, along with supplemental anchoring tools like snubbers and bridles, can significantly enhance your experience on the water. From preparations to anchor setting and retrieval, each step has its own nuances that, when executed correctly, contribute to an efficient and safe anchoring process.
With this comprehensive guide, you should be better prepared to use your windlass system to its fullest potential. Happy cruising!